J4L OCR Tools
Introduction
The J4L OCR tools is a set of components that can be used in Java
applications to recognize text within an image and parse such texts. This can be
used to scan or fax business documents like purchase orders and extract the data
from them. Another use case is to archive images and indexing them with data
extracted from the content.
The tools are made of 2 main components:
- The text generator which can be:
- The Java wrapper for the Tesseract OCR engine. This
wrapper will be used for converting images to text using the Tesseract OCR engine.
- Or the PDF to Text converter which converts PDF files to text.
- The document parser will extract the data from the
text provided by the OCR engine or PDF to text converter.
Requirements
The Java components require Java 1.5 or later. If you are going to use the
OCR engine Tesseract, it requires Windows.
J4L Java wrapper for Tesseract OCR engine 3.0
Introduction
Tesseract OCR is a free
OCR engine sponsored by Google. The J4L Java Wrapper classes is a bridge
that allows you to use the engine from your Java application. The current
implementation will run on windows only, however it is possible to create a
Linux version also, let us know if you have such requirement.
The benefits of the J4L wrapper are:
- will abstract your Java application from the C/C++ details of the OCR
engine.
- it is very easy to use
How install the software
The zip file we distribute can use used directly after unzipping without
additional setup. However if you use our classes in your own application you
need to take this into account:
- tess3WrapperDLL.dll and leptonlibd.dll must be located in the
current working directory or in the system's path.
- the subdirectory tessdata must be located in the working directory.
- the files lib/jai_codec.jar and lib/jai_core.jar must be
located in your classpath if you are going to read tiff files.
- if you are going to process files in other language than english you must
download the corresponding language file from:
http://code.google.com/p/tesseract-ocr/downloads/list
the files are called like XXX.traineddata.gz where XXX is
the language. There is support for eng (english), spa (spanish), fra
(french), deu (german), nld (dutch), ita (italian) and many other langauges. These files must be
unzipped in the tessdata subdirectory of the working directory.
Running the test application
Our distribution includes a runOCRParserTest.bat file which will take the file
order.png as input file and will output the content of the file as text after
running the OCR engine. The code being executed is the file OCRTest.java.
How to use the classes in your Java programs
The usage of the classes is very simple:
- Import the facade class:
import com.java4less.ocr.tess.OCRFacade;
- create the facade object:
OCRFacade facade=new OCRFacade();
- run the OCR by providing an input file and language
String text=facade.recognizeFile("Report.PNG",
"eng");
this will return a text string. If the image is a multipage file the pages
will be separated by the FF character (asii character 12) in the text string.
PDF to Text Converter
Introduction
Our component uses Apache PDBox to parse the PDF files and extract the text
content. The extracted text will be formatted in the similar way as the text in
the PDF file, that means the line a columns positions of the values will be
similar.
Note however the text conversion works only if the PDF file contains text
elements. For example, some faxes or scanner can create PDF files but these
files contain just images of the scanned page and not text elements. The
converter would not work on this kind of files.
How to use the classes in your Java programs
The usage of the classes is very simple:
- Import the class:
import com.java4less.pdf.PDFToTextConverter;
- create the converter object:
PDFToTextConverter conv=new
PDFToTextConverter();
- run the converter by providing an input file
String text=conv.convertToString(new
FileInputStream("order.pdf"));
this will return a text string. If thepdf is a multipage file the pages
will be separated by the FF character (asii character 12) in the text string.
J4L Document parser
The document parser will help you in extracting the information from the text
returned by the OCR engine. The benefits of using our document parse are:
- It provides a clear declarative interface to extract data (xml based).
- It will save you from writing lot of plumbing code.
- The document parser will also understand labels that are not correctly read
by the OCR engine. For example , if you are looking for a label called
"Total", but the engine reads "Totai", the document
parse will still find the label.
Introduction
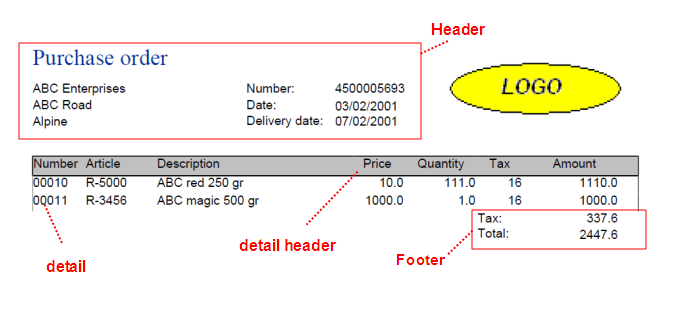
The document parser divides the data in sections, normally a document has a
header section, a detail section that can be repeated and a footer section. The
following screenshot shows a documents with 4 sections:
- The header that starts on the top of the document.
- The detail header.
- The detail which can be repeated and has a hight of 1 line each.
- The footer.
But how does the parser know where the sections are located? It uses 2 rules:
- Some sections can be identified because they contains a certain label (we
use the term label and text mark for this). For example, the detail header
can be found by looking for the text "Number Article Description".
What happens if the OCR engine reads the values "Nunber Articlo
Descripton"? The parser will still find it.
- Other sections can be identified because they are located after a fixed
length section. For example, we know the detail header has length 1 line,
and after that the detail section starts.
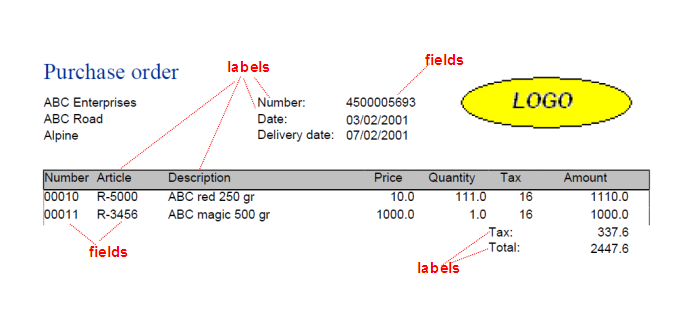
The other type of object in the document are labels (or text marks)
which are constant values (all documents of the same type have the same label at
the same position) and fields, which are variable values, normally
located next to labels.
To summarize, labels are used to find fields and sections.
How to create a document definition
The document definition is a XML file that describes the sections of a document
and the labels and fields. This XML file will be used at runtime to parse the
text returned by the OCR engine, The XML's file root node is called <documentref>
and his children are <section>. The following XML shows main structure of
the example document used in the introduction:
<documentref>
<section name="header">
</section>
<section name="detailsheader" len="1">
</section>
<section name="detail" repeteable="true"
len="1" >
</section>
<section name="footer" mandatory="false">
</section>
</documentref>
this defines the 4 sections of the document. As a general rule, sections are
mandatory, they must exist in the document, non mandatory sections are allowed
only at the end of the document.
Now we have to define how to
find the sections:
- The header section is the first in the document so it starts on the top of
the document and requires no further definition
- The detail header will start when we find the label "Number
Article"
- The detail section will start after the detail header which has a fixed
length of 1 line so no further definition is required.
- The footer section will start when we find the text "Tax:"
The tag <startlabel> will be used to define the label which
identifies the section:
<documentref>
<section name="header">
</section>
<section name="detailsheader" len="1">
<startlabel
name="detailsheaderlbl">
<value>Number Article<value>
</startlabel>
</section>
<section name="detail" repeteable="true"
len="1" >
</section>
<section name="footer" mandatory="false">
<startlabel
name="detailsheaderlbl">
<value>Tax:<value>
</startlabel>
</section>
</documentref>
Now the structure of the document has been defined. The next step is defining
the fields we want to extract and the labels we will use to locate the fields.
In this example we will read 3 fields
- The purchase order number in the header. The purchase order number is
located right to the label "Number:"
- The article number and quantity from the detail section. The article is
located as second field in each line, and the quantity is the third element
starting from the left.
In each section you use the <label> tag to define label and the <field>
tag to define fields. The fields have 2 positions, x and y (line). Each
position has a reference to a label or another field and the directions how to
find the field.
<documentref>
<section name="header">
<label name="numberlbl"> ***
define the label Number: ****
<value>Number:</value>
</label>
<field
name="numberValue" mandatory="true" type="S"
format="[0-9]{10}">
<x>
<reference>numberlbl</reference>
*** this field is located next to the numberlbl
****
<direction>RIGHT</direction>
<distance>1</distance>
*** the field is 1 word to the right ****
</x>
<y>
<reference>numberlbl</reference>
*** the number label us used to find the line of
the field****
<direction>UP</direction>
<distance>0</distance>
*** the field is in the same line as the
reference ****
</y>
</field>
</section>
<section name="detailsheader" len="1">
<startlabel
name="detailsheaderlbl">
<value>Number Article<value>
</startlabel>
</section>
<section name="detail" repeteable="true"
len="1" >
<field
name="articleValue">
<x>
<reference>BeginOfLine</reference>
*** this field is the second word from the beginning of
the line ****
<direction>RIGHT</direction>
<distance>2</distance>
</x>
<y>
<reference>BeginOfSection</reference>
*** this field is located in the first line of
the section****
<direction>DOWN</direction>
<distance>0</distance>
</y>
</field>
<field
name="quantityValue">
<x>
<reference>EndOfLine</reference>
*** this field the third word from the end of the line ****
<direction>LEFT</direction>
<distance>3</distance>
</x>
<y>
<reference>BeginOfSection</reference>
*** this field is located in the first line of
the section****
<direction>DOWN</direction>
<distance>0</distance>
</y>
</field>
</section>
<section name="footer">
<startlabel
name="detailsheaderlbl">
<value>Tax:<value>
</startlabel>
</section>
</documentref>
It is possible to read a field at a fixed position as shown below, the
delivery date will be located in line 3 at column 60:
<field name="DeliveryDate" type="D" format="dd/MM/yyyy" mandatory="false">
<x>
<reference>BEGINOFLINE</reference>
<direction>RIGHT</direction>
<distance>60</distance>
<useColumnPosition>true</useColumnPosition>
</x>
<y>
<reference>BEGINOFSECTION</reference>
<direction>DOWN</direction>
<distance>3</distance>
</y>
</field>
If you want to use the absolute position of the field instead of using
associated labels, you must first convert the PDF or image to text in order to
find out what the position of a field will be. This approach should be used only
with PDF files and setting the property setPreserveSpaces() of the class PDFToTextConverter
to true.
Error handling
The parser can detect the following kind of errors:
- Missing mandatory sections. The default value is, all sections are
mandatory.
- Missing mandatory field. The default value is, all fields are mandatory.
- Field format error. Each field can have a type which is string (default),
numeric or date.
- For string fields you can use a regular expression to define the
expected format, for example, the regular expression [0-9]{10} means a
string made of 10 digits. The regular expressions are those supported by
java.util.regex.Pattern. For example:
<field name="Number"
type="S"
format="[0-9]{10}">
- For date fields, the format can be any supported by the class java.text.SimpleDateFormat.
<field name="DeliveryDate"
type="S"
format="dd/MM/yyyy"
mandatory="false">
- For numeric fields, the format can be any supported by the class java.text.DecimalFormat.
<field name="Quantity"
type="N"
format="####0">
the format attribute is required only if you want the parser to check the
format for the value, otherwise do not add the format attribute to your field.
How to run the parser
In the previous sections you have learnt how to create a document definition
in XML format. In the wrapper section we showed how to
use the OCR engine to obtain a String out of an image file. The next step is to
use our Java classes to parse the obtained String using the document definition
XML file.
The steps to do this are:
- Create a DocumentDef object and load your XML file as follows
DocumentDef docDefinition=new
DocumentDef();
docDefinition.loadFromXml("purchaseorderDefinition.xml");
- Create a Parser object and parse the data String:
Parser parser=new
Parser(docDefinition);
DocumentSet docSet=parser.parse(data); // the variable data is the
string returned by the OCR engine
- once the data has been parsed, you can obtain the sections and fields
Document doc=docSet.getDocument(0);
Section header=doc.getSectionByName("header")[0];
String number=header.getField("numberValue");
- You can check if the are errors in the document by calling the method doc.hasError().
If it returns true you use the method doc.getErrors() to get the list
of errors, which can be any of these: SectionMissingException,
FieldMissingException or FieldFormatException.
Exporting data to XML
The data read by the Parser can be exported to XML by calling documentSet.toXml().
The output will look like this:
<Set> root element
<PurchaseOrder> name of the
document
<order_header> section
<Number>4500005693</Number>
field
<DeliveryDate>07/02/2001</DeliveryDate>
field
</order_header>
<col_header/>
<items_detail> section
<Article>R-5000</Article>
<Quantity>111.0</Quantity>
</items_detail>
<items_detail> section
<Article>R-3456</Article>
<Quantity>1.0</Quantity>
</items_detail>
<order_footer/> section
<Error field="Number" section="order header" sectionRepetition="1">FieldFormatError</Error>
<Error field="DeliveryDate" section="order header" sectionRepetition="1">FieldFormatError</Error>
</PurchaseOrder>
</Set>
The root element is <Set>, followed by the document name element whose
children are the sections. Within each section, the elements are the fields of
the section. After the sections there could be only or more <Error>
elements which reports missing sections, missing fields or format errors.
The OCR Servlet
The product includes a servlet which takes as input an image file, runs the OCR
engine and parses the text data. The result returned by the servlet will be the
XML data of the document.
The servlet has to be installed on Tomcat for Windows like this:
- copy the file J4LOCRServer.war to the tomcatdirectory\webapps
directory.
- copy tess3Wrapper.dll and leptonlibd.dll to
tomcatdirectory\bin directory.
- copy the tessdata subdirectory to tomcatdirectory\bin
directory.
- start tomcat
the servlet can be tested by openning this URL:
http://localhost:8080/J4LOCRServer/Example.html
this opens a form so that you can upload the file order.png to the servlet.
The servlet URL is /J4LOCRServer/OCRServer and it requires the following parameters as part of the URL:
- DEFINITION parameter: used to set the document definition file used to
parse the document, in our example it is ordedef.xml. This file must
be located in the directory webapps\J4LOCRServer\WEB-INF\classes.
- Set DATAFIELD=YES if the image is going to be uploaded using a HTML file.
If this paramter is missing the Servlet must be called using the POST method
and sending the image data.
The PDF Converter Servlet
The product includes a servlet which takes as input an PDF file, runs the PDF
converter and parses the text data. The result returned by the servlet can be
text or XML data of the document.
The servlet has to be installed on Tomcat for Windows like this:
- copy the file J4LOCRServer.war to the tomcatdirectory\webapps
directory.
- start tomcat
the servlet can be tested by openning this URL:
http://localhost:8080/J4LOCRServer/ExamplePDF.html
this opens a form so that you can upload the file order.pdf to the servlet.
The servlet URL is /J4LOCRServer/PDFConvServer and it requires the following parameters as part of the URL:
- DEFINITION parameter: used to set the document definition file used to
parse the document, in our example it is ordedef.xml. This file must
be located in the directory webapps\J4LOCRServer\WEB-INF\classes. If this
parameter is missing the text will be returned (instead of the parsed
content as XML).
- Set DATAFIELD=YES if the image is going to be uploaded using a HTML file.
If this paramter is missing the Servlet must be called using the POST method
and sending the image data.
Third party software
Our component uses the Tesseact OCR engine, Apache Xalan, Apache Xerces and
Apache commons which are distributed under the
Apache 2,0 license and the Sun Java Advanced Imaging API, used to read tiff
files.
The PDF to Text converter uses the Apache PDBox library, the Apache Jempbox
library and the Apache Fontbox library.
|